Would you like a splendid Christmas dessert? Well, we can’t deliver this, ready-made, to you — but have we got a _recipe_ for you!

I’ve kept my word and have been whipping up “new cream pies every month”:/news/2012/a-years-worth-of-cream-pies/ since August. We don’t have time right now to tell you about our October (peanut butter!) and November (gingerbread!) pies, but we do want to share one of our new favorites with you: peppermint cream pie.
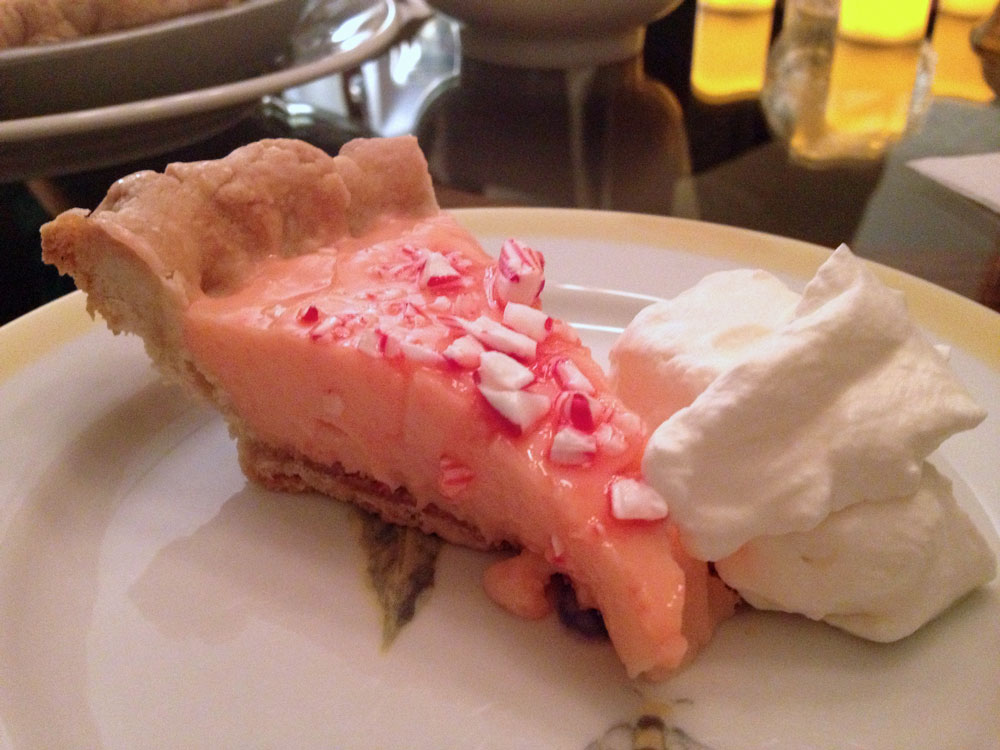
We made this for “Grammie’s”:/news/2009/poolside-with-grammie/ birthday in early December, and it was a hit all around. Cool and refreshing, sweet and pepperminty, and delightfully festive. It’s a little bit like candy-cane ice cream in a cream pie!
Whether you make this now or in July (as “Grandpa”:/news/2008/happy-unbirthday-rosie/ advocates), we wish you a warm and merry Christmas!
h2. Peppermint Cream Pie
_This recipe is modified from the Vanilla Cream Pie recipe in “Baking Illustrated”:http://amzn.com/0936184752, one of my very favorite baking cookbooks from the “Cook’s Illustrated”:http://www.cooksillustrated.com people._
h3. Peppermint Cream Filling
½ cup plus 2 tablespoons sugar
¼ cup cornstarch
1⁄8 teaspoon salt
5 large egg yolks, lightly beaten
2 cups whole milk
½ cup evaporated milk
2 teaspoons pure peppermint extract
1 teaspoon vanilla extract
2-3 drops pink or red food coloring
2 tablespoons butter
h3. Crust
1 fully baked pie crust, ideally coated with graham cracker crumbs (see “note below”:#crust)
h3. Topping
1 cup heavy cream, chilled
1 tablespoon sugar
1 teaspoon vanilla extract
¼ cup crushed peppermint candies (more or less, depending on your taste)
*For the Filling.* Whisk the sugar, cornstarch, and salt together in a medium saucepan. Add the yolks, then immediately but gradually whisk in the milk and evaporated milk. Cook over medium heat, stirring frequently at first, then constantly, as the mixture starts to thicken and begins to simmer, 8 to 10 minutes. Once the mixture simmers, continue to cook, stirring constantly, for 1 minute longer. Remove the pan from the heat; whisk in the extracts, food coloring, and butter.
Pour the filling into a shallow pan or bowl. Put plastic wrap directly on the filling surface to prevent a skin from forming; cool until warm, 20 to 30 minutes. (The authors make a big deal out of waiting _precisely_ this long, so the filling is warm but not hot, before pouring it in the pie.) Pour the filling into the pie shell and, once again, place a sheet of plastic wrap on the filing surface. Refrigerate until completely chilled, at least 3 hours.
*To serve.* Beat the cream and sugar with an electric mixer at medium speed to soft peaks; add the vanilla. Continue to beat to barely stiff peaks. Spread the whipped cream over the filling, sprinkle with crushed peppermint candies, and serve immediately. Or if you anticipate leftovers, dollop the cream filling on individual slices of pie and sprinkle each piece with crushed peppermints. (We can tell you from experience that you should _not_ sprinkle the candies on the pie in advance, unless you enjoy weepy melted candies all over your cream pie.)
h3. About the pie crust
_I wrote up this extended discussion about pie crusts in our “first post about cream pies”:/news/2012/a-years-worth-of-cream-pies/ ‎. Here is it again! If you’re making this soon, just go ahead and buy the pie crust. I won’t tell anyone._
The _Baking Illustrated_ people really stressed me out at one point in my life with their pie crust instructions. I used to have stomachaches whenever I needed to make a pie crust. So now I don’t really follow their instructions precisely, and it turns out fine. Here is what I do for a fully-baked pie crust for a cream pie:
Make up some pie dough according to “Martha Stewart’s Pâté Brisée”:http://www.marthastewart.com/317858/pate-brisee-pie-dough recipe. Sure, maybe it’s not the flakiest in the world because there is no shortening or lard, but I’ve got the butter in the house and it’s easy. (And plenty yummy.)
Roll out the dough and put it in the pan. If you feel like it, flute the edges, or just crimp them with a fork. Stick the dough-lined pan in the fridge. (I usually do this the day before baking, just because I have other things going on in my life and don’t have all day to make pies.)
When you’re ready to bake the crust, preheat the oven to 375°. Take about ½ cup of finely crushed graham cracker crumbs and press them into the refrigerated pie shell. It helps to use a glass or something to press them in pretty well. They won’t all stick perfectly — but that’s okay. You want the bottom coated with graham cracker crumbs to prevent sogginess later. Once it is nice and crumby, stick the dough-lined pan into the freezer. Leave it there for 20 minutes, or at least as long as it takes for your oven to preheat.
Now, take a nice long sheet of aluminum foil and fold it, doubled over. Line your pan with it, covering over the edges. (Now do you see why this is such a pain? And why I don’t make a lot of cream pies unless I receive an irresistible challenge?) Fill the pan with coins; we favor pennies. Stick the pan with foil and coins in the oven and bake for 25-30 minutes. They say to bake it “until the dough looks dry and is light in color.” When it looks like that, “carefully remove the foil and weights by gathering the corners of the foil and pulling up and out.” (This sounds terrifying, but just do it quick and it will probably be okay.) Then, put the naked crust back in the oven for about 12 minutes, until “deep golden brown.” Then cool that puppy until you’re ready to fill it.
If you’re not as completely obsessive as I am, you can get a store-bought crust and save yourself a big chunk of your life. I hear the Trader Joe’s ones are good, made with all butter.